Setting Up Try-On Products in WooCommerce (Images, Size, Variants)
Once the plugin is installed and your first product works, it’s time for the rest. This article covers the practical details of configuring try-on on the WooCommerce product edit screen. Installation itself is in the setup guide.
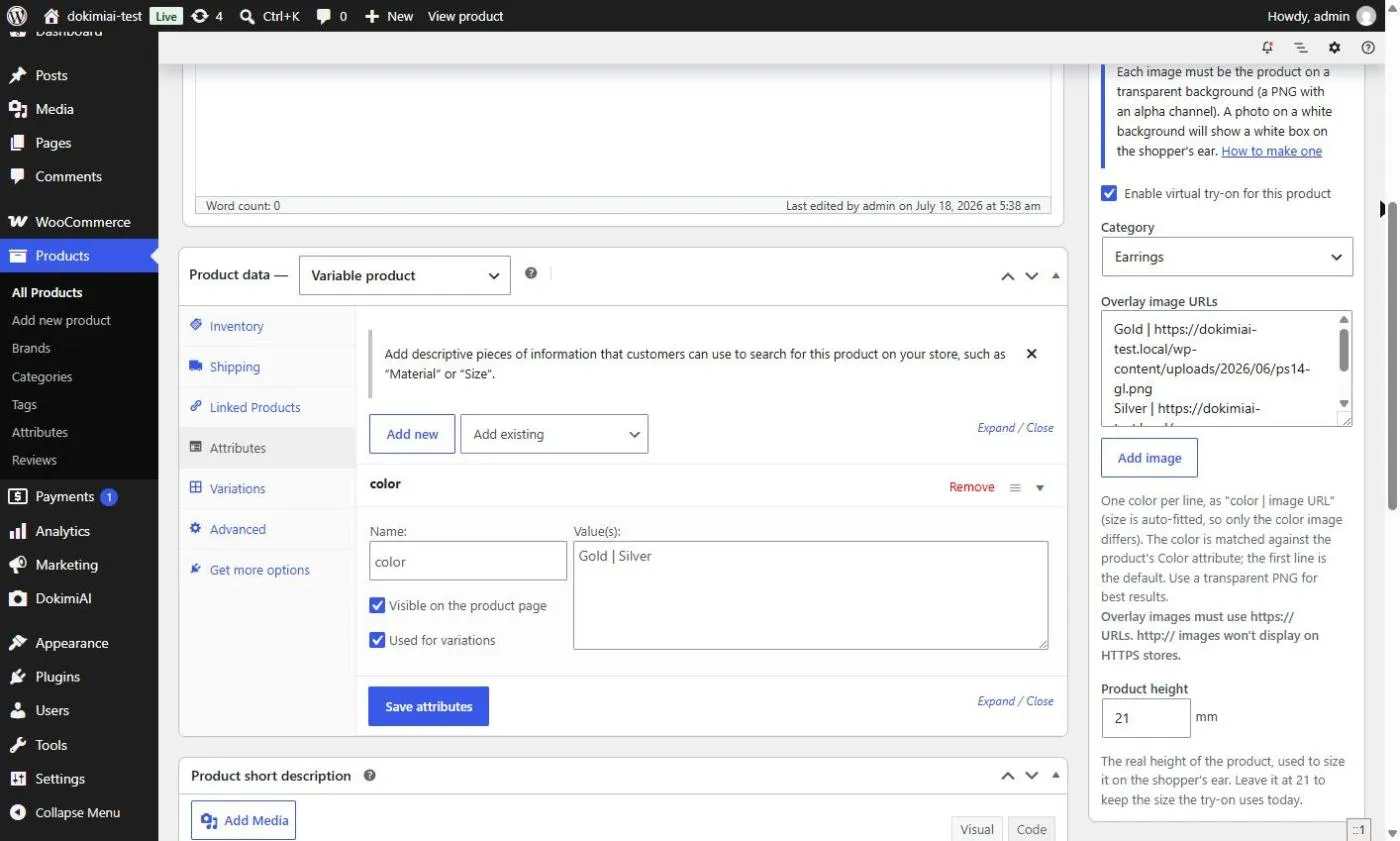
The “DokimiAI Try-On” box on the product edit screen
Four fields:
| Field | What it does |
|---|---|
| Enable | Only checked products get the button |
| Category | Hoop / stud / ear cuff — decides where and how it sits on the ear |
| Color + image | A color name and a transparent PNG, one row per color variant |
| Size (mm) | Product height. Blank = 21 mm default |
Simple vs. variable products
Simple products (no color variants) need one color row. The name is free-form — default is fine.
Variable products need the color row name to match the color attribute value exactly. This is the single biggest stumbling block.
| Attribute value (WooCommerce) | Color row name | Result |
|---|---|---|
| Gold | Gold | ✓ |
| Gold | gold | ✗ case-sensitive |
| Gold | Gold (18K) | ✗ no match |
| Yellow Gold | Gold | ✗ no match |
There’s no error — the color simply doesn’t render. Before writing color rows, copy the attribute values from Product data → Attributes.
Non-color attributes (size, length) don’t affect color rows. The try-on image is chosen by color alone.
Choosing the image
Color rows pick from the media library, and the media library is fine as the host (same site, so no cross-origin restrictions).
Three requirements:
- Transparent PNG (a JPEG or white-background PNG becomes a white panel)
- Margins cropped tight around the product (margin counts as “height” and makes the product render small)
- No post visible on studs
This is a separate file from your normal gallery images. The gallery can stay as white-background JPEGs.
Deciding the size value
Enter the product’s height — its vertical extent when worn — in mm.
- Stud: vertical length of the decorative part
- Hoop: inner diameter + wire thickness × 2
- Drop: from where it hangs on the lobe to the bottom
If a hoop’s description says “12 mm diameter,” check whether that’s inner or outer. Outer: use as-is. Inner: add wire × 2.
Products with size variants
For products offered in 8 / 10 / 12 mm and so on, you can register a size per variant. The requirement is a unique SKU on each variation. Blank or duplicate SKUs mean size switching does nothing.
WooCommerce stores often leave variation SKUs empty, so fill them in first: open each variation under Product data → Variations and set the SKU.
One image per color; nothing per size.
An efficient order for many products
The order we used for several hundred SKUs:
- Batch by category. All hoops in a row means the same size calculation every time
- Best sellers first. Not everything — the top 10–20
- Make all images first, then bulk-upload to the media library. Making images product by product breaks your rhythm every time
- Check each product on your phone as you go. Checking in bulk later means you can’t tell which product has which mistake
With images ready, it’s 2–3 minutes per product.
Products you don’t want try-on on
Uncheck Enable. The image and size stay saved, so you can re-enable later. Keep it off for products that won’t cut cleanly and for non-earring products (rings, bracelets) — those categories aren’t supported yet.
Summary
- Variable products: color row names must match attribute values exactly (case included)
- Media library is fine; transparent, tightly cropped, no post
- Size = height. Hoops: inner diameter + wire × 2
- Size variants require a unique SKU per variation
- Batch by category, best sellers first, images first, check as you go
Nearly all the effort is in the images, so register products in the order their images become ready.